Setting up a development environment on Linux
This is a guide to setting up a development environment on Linux that lets you run the entire OpenCue system, including Cuebot, CueGUI, and RQD. After you complete the setup, you can make changes to any part of the development environment.
Before you begin
First, clone the OpenCue git repository to your machine. You also need to download and install OpenCue’s core dependencies:
PostgreSQL version 9 or greater.
- We recommend installing Postgres using a
yum-based Linux distribution, such as CentOS:
- First, run
yumto install the required Postgres packages:
yum install postgresql-server postgresql-contrib- Next, initialize your Postgres installation and configure it to run as a service:
postgresql-setup initdb systemctl enable postgresql.service systemctl start postgresql.service- Create a superuser named after your current OS user, which is used for the rest of the admin commands in this guide.
su -c "createuser -s $USER" postgres- We recommend installing Postgres using a
-
- We recommend installing Python 3 using a
yum-based Linux distribution, such as CentOS:
yum install -y python36 python36-libs python36-devel python36-pip- This will install Python 3.6.4 on your CentOS 7 machine as well as installing a native Python package management tool called pip. You can simply check it by
python3.6 -V.
- We recommend installing Python 3 using a
Java SE JDK version 11 or greater
- We recommend installing Java 11 using a
yum-based Linux distribution, such as CentOS:
yum install java-11-openjdk-devel- This will install openjdk version “11.0.3” on your CentOS 7 machine. You can simply check it by
java -version.
- We recommend installing Java 11 using a
It’s also useful to install an IDEs. JetBrains has free community versions of the following options:
PyCharm for Python
IntelliJ IDEA for Java
Database setup
After installing PostgreSQL you need to create a database and user for OpenCue — specifically Cuebot — to use.
Using the command-line
To set up the database using the command-line:
- Define and export the following shell variables for a database named
cuebot_local:
   export DB_NAME=cuebot_dev
   export DB_USER=cuebot
   export DB_PASS=changeme
export DB_HOST=localhost- Create the database and the user that Cuebot uses to connect to it:
   createdb $DB_NAME
   createuser $DB_USER --pwprompt
   # Enter the password stored in DB_PASS when prompted
   psql -c "ALTER DEFAULT PRIVILEGES IN SCHEMA public GRANT ALL PRIVILEGES ON TABLES TO $DB_USER" $DB_NAME
Change your current directory to the root of your OpenCue Git clone.
Visit https://github.com/AcademySoftwareFoundation/OpenCue/releases and download the SQL files from the latest release’s Assets. There should be two - a
schemafile and ademo_datafile.Populate the database schema and some initial data, run the
psqlcommand:psql -h $DB_HOST -f <path to schema SQL file> $DB_NAMEThe
demo_dataSQL file contains a series of SQL commands to insert some sample data into the Cuebot database, which helps demonstrate various features of the software. To execute the SQL statements, run thepsqlcommand:psql -h $DB_HOST -f <path to demo_data SQL file> $DB_NAMETo see a list of flags for the
psqltool, run thepsql --helpcommand. For example, if your database is running on a remote host, specify the-hflag. If you need to specify a different username, specify the-Uflag.
Running Cuebot
Cuebot is the core component of OpenCue, written in Java. It serves the gRPC API which all other components use to interact with the database, and is responsible for dispatching work to RQD worker nodes.
To build and run it with IntelliJ IDEA:
Open IntelliJ IDEA and choose Import Project, select the
cuebotfolder in the git repository.Choose the Import project from external model > Gradle option then click Finish.
Click Build > Rebuild Project.
IntelliJ downloads Gradle and all source dependencies, then compiles the project and runs tests.
Browse to the
src/main/java/com.imageworks/spcue/CuebotApplicationfile.Click Edit ‘CubotApplicat….main()’….
Update the Program arguments as follows and replace the value for
<PASSWORD>where indicated:
--datasource.cue-data-source.jdbc-url=jdbc:postgresql://localhost/cuebot_dev --datasource.cue-data-source.username=cuebot --datasource.cue-data-source.password=<PASSWORD>
Click OK.
Click Run > Run ‘CuebotApplication’.
Verify that the output window doesn’t show any errors.
If it does, double-check that you have set up the database correctly, including permissions, and have set the Program arguments correctly.
Create a virtual environment
OpenCue consists of multiple Python components which are interrelated. These components include RQD, CueGUI, and the Python API.
We recommend creating a Python virtual environment specifically for development use that you can use for all components. This will help keep dependencies synchronized across your OpenCue deployment.
Open a terminal and change to the root folder of your OpenCue Git clone.
Create a virtual environment named
venv-dev:
python3 -m venv venv-devYour virtual environment can be named whatever you want; this rest of this guide assumes
you’re using one named venv-dev.
- Activate the virtual environment:
source venv-dev/bin/activateConfigure PyCharm
Similar to the virtual environment, we recommend configuring your IDE as a single project containing all of the Python components. PyCharm is used here.
Open PyCharm and choose Open. Select the root folder of the git repository.
Open the PyCharm preferences and navigate to Project: opencue > Project Interpreter.
Add a new interpreter, using the following settings:
- Virtual environment
- Existing environment
- Interpreter set to
<path to git repository>/venv-dev/bin/python
PyCharm should prompt you to install ‘Package requirements’. This will install OpenCue’s Python dependencies into your virtual environment.
This can take a few minutes, namely to download PySide2.
In order for inter-dependencies within the code to work in PyCharm you need to mark each components as a source directory. In the PyCharm file browser, right-click on each OpenCue component and click on Mark Directory As > Sources Root. You need to do this for:
cueadmin/cuegui/cuesubmit/proto/pycue/pyoutline/rqd/
Generate gRPC Python code
The OpenCue data model and gRPC API are defined using
.proto Protobuf files. To make use of
these definitions at runtime the Protobuf files must first be “compiled” into native code —
Java and Python in our case, though Protobuf supports many languages. This increases consistency
across OpenCue components and reduces code repetition.
Generating the Python versions of OpenCue’s .proto files for RQD and the PyCue library is
currently a manual process. To generate the Python code:
Open a terminal, change to the root directory of the Git clone, and activate your virtual environment as described above.
Install the required gRPC tools:
pip -m install grpcio-toolsChange directory to the
protofolder.Generate the Python versions of the gRPC classes:
python -m grpc_tools.protoc --proto_path=. --python_out=../rqd/rqd/compiled_proto --grpc_python_out=../rqd/rqd/compiled_proto *.proto
python -m grpc_tools.protoc --proto_path=. --python_out=../pycue/opencue/compiled_proto --grpc_python_out=../pycue/opencue/compiled_proto *.proto
The
.protofiles also need some post-processing to make them compatible with Python 3. The easiest way to do this is to install and run the2to3package.Run the following commands to install the
2to3package and complete the post-processing:pip install 2to3 2to3 -wn -f import ../rqd/rqd/compiled_proto/*_pb2*.py 2to3 -wn -f import ../pycue/opencue/compiled_proto/*_pb2*.py
Running RQD
RQD is the OpenCue rendering host agent, written in Python.
To run RQD with PyCharm, right-click rqd/__main__.py and click Run.
Note
RQD by default will look atlocalhost for a
Cuebot server. If you want to point at a different Cuebot,
set the CUEBOT_HOSTNAME environment variable.
Running CueGUI
CueGUI lets you monitor the status of jobs and rendering hosts, written in Python.
To run CueGUI with PyCharm, right-click cuegui/__main__.py and click Run.
Note
CueGUI by default will look atlocalhost for a
Cuebot server. If you want to point at a different Cuebot,
set the CUEBOT_HOSTS environment variable.
This can be a single hostname/IP address or a comma-separated list of addresses.
Running CueSubmit
CueSubmit lets you submit jobs to OpenCue, written in Python.
To run CueSubmit with PyCharm, right-click cuesubmit/__main__.py and click Run.
Note
CueSubmit by default will look atlocalhost for a
Cuebot server. If you want to point at a different Cuebot,
set the CUEBOT_HOSTS environment variable.
This can be a single hostname/IP address or a comma-separated list of addresses.
Verify your installation
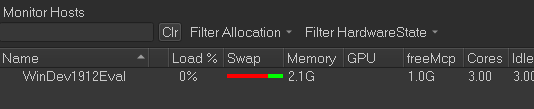
After you are running Cuebot, CueGUI, and RQD simultaneously, you should be able to see the RQD host in CueGUI:
From the Views/Plugins menu, click Cuecommander > Monitor Hosts.
In the Monitor Hosts section, check the Auto-refresh box as illustrated by the following screenshot:
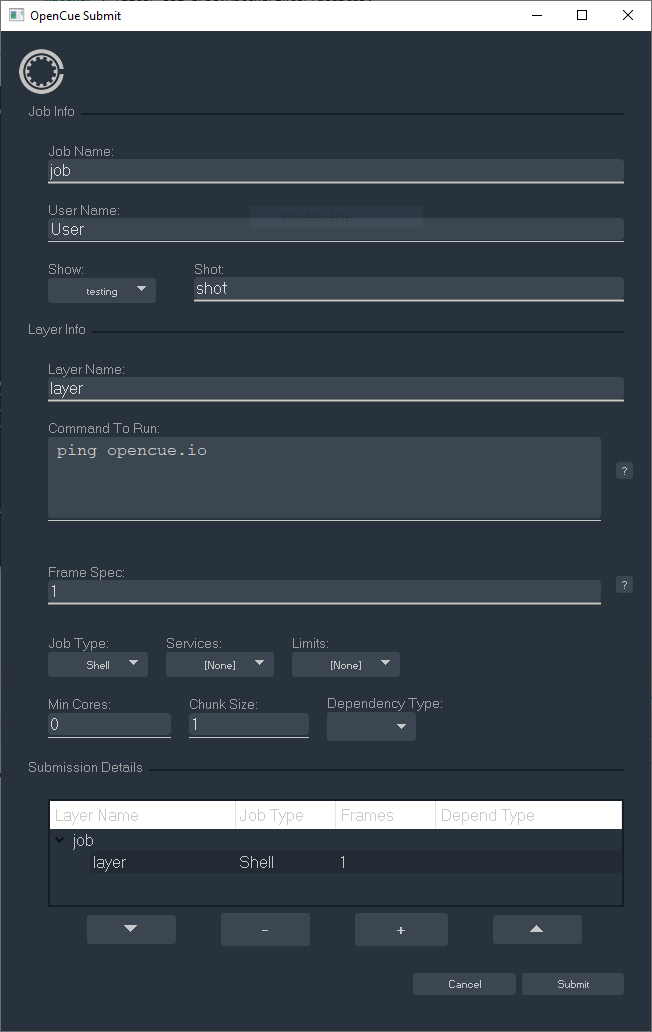
Next, check that you can run a job by using CueSubmit.
Switch to CueSubmit and fill out Job, Shot, and Layer Name fields as you like.
Set the Command to
echo #IFRAME#.
Note
#IFRAME# is a “token”; it is replaced by Cuebot
with the current frame number before each frame is sent to RQD for processing.
Set Frame Spec to
1-3.Click Submit:
- Switch back to CueGUI and verify that the job completes successfully:

This verifies that your end-to-end installation is working.
Feedback
Was this page helpful?
Glad to hear it! Please tell us how we can improve.
Sorry to hear that. Please tell us how we can improve.